This chapter contains the following topics:
Introduction to Recurring Payables
Selecting Recurring Payables for Use
Printing a Selection List and Use Selected
The Recurring Payables selection makes it easier to handle payables which occur periodically. Examples are rent, utilities, telephone, loan payments and insurance premiums.
Setting up a recurring payable does not commit you to creating a voucher when a certain time interval falls due. It merely simplifies the process of creating such vouchers, and ensures consistency and accuracy for them.
The menu selections and step sequence for generating an open item from an entered recurring payable include:
| Main menu | Sub Menu | Description | Frequency |
|---|---|---|---|
|
Recurring payables |
Enter |
Enter your payable vendor, amount, discount and recurring frequency |
Once per recurring payable |
|
Recurring payables |
Edit list |
To optionally print the entered recurring payables |
As needed to verify the recurring payables are entered properly and when due |
|
Recurring payables |
* Select for use |
Select those recurring transactions that will eventually be paid |
Per period when the payable is due |
|
Recurring payables |
Selection list |
To optionally print an edit list of the selected recurring payables |
Print as needed to verify those selected for use |
|
Recurring payables |
* Use selected |
Generate payables |
Per period when the payable is due |
|
Payables |
Enter, Edit list and Post |
Use as needed to edit payables and generate open items |
Per period when the payable is due |
* You still have to select the recurring payables before using them as regular vouchers. This is a two-stage process; selection is one step and using is another. This allows you to review your selections before committing to them.
| • | The selection process can be done manually or automatically. |
Automatic selection allows you to select many entries at a time. You can do this by groups, based on a group code you assign to each entry.
Manual selection lets you select entries individually.
You can combine both methods. For instance, suppose this is the last week of the last month of a quarter. You automatically select groups W2, M2, and Q, where these are respectively your codes for weekly bills, monthly bills paid at month-end, and quarterly bills. You then use manual selection to unselect one entry for a vendor whose bill you dispute. You then use manual selection again to select the snow plowing bill (which does not have a group number because it occurs at irregular intervals).
For both automatic and manual selection, you can optionally select recurring payables by date as they fall due. In order to do this, you specify for each entry the date when it is first due and the interval between successive payments thereafter.
You can choose to select exclusively by date, exclusively by group, or both.
| • | The using process takes all selected recurring payables and converts them to regular vouchers (that is, to entries in Payables). |
Once recurring payables have been selected for use, they cease to be selected. They remain as entries in Recurring payables, but you have to select them again the next time you want to use them.
The vouchers created by Use selected are just like vouchers entered manually. Like other Payables entries, they still have to be posted before checks can be written for them.
In addition to entering, selecting, and using recurring payables, you can print an edit list of all recurring payable entries or a selection list of selected entries. Using the edit list you can also print a list of expired recurring payables.
Select
Enter from Recurring Payables menu.
If you are using Batch controls a screen appears at this point for you to select the appropriate batch. Refer to the Using Batch Controls chapter in the System User documentation.
This selection lets you enter new recurring payables and change or delete existing recurring payables.
|
Note |
Once a recurring payable has been selected for use, you cannot change or delete it until it has either been used or unselected. To unselect a recurring payable, refer to Unselecting Recurring Payables. |
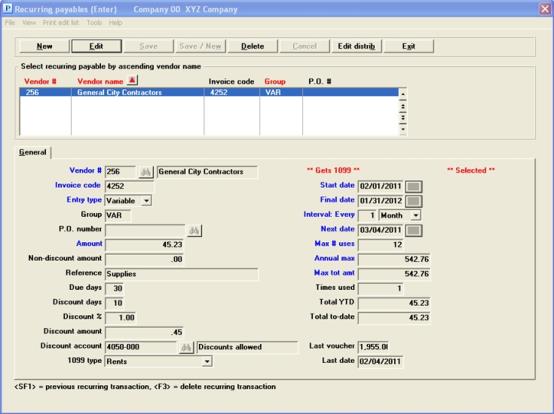
Two screens are needed for this selection. The following screen appears first:
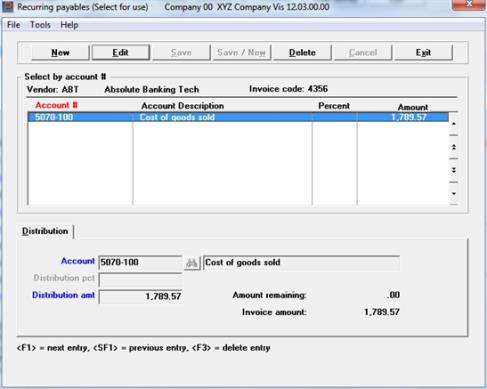
Graphical Mode
The list box displays up to 6 recurring payables at a time. You may sort the recurring payables by vendor number, vendor name or group, all in ascending or descending order. Only column names in red may be sorted. Click on the column name or the arrow to the right of the column name to change the sort or use the View options.
To locate a recurring payable, start typing the vendor name, vendor number or group, depending on which sort field is selected. You may also use the up/down arrows, Page up, Page down, Home and End keys to locate a recurring payable. The <F1> and <SF1> function the same as the up/down arrow keys.
Recurring payables that display in the list box are available for changes or deletion. The fields for the selected recurring payable display in the lower part of the screen.
When a recurring payable is found, you may select the <Enter> key or Edit button to start editing.
The buttons and keyboard equivalents have the following functions:
| Button | Keyboard | Description |
|
New |
Alt+n |
To enter a new recurring payable |
|
Delete |
Alt+d |
To delete the recurring payable selected in the list box. Selecting <F3> will also delete it |
|
Edit |
Alt+e |
To edit the recurring payable selected in the list box |
|
Save |
Alt+s |
To save a new recurring payable or changes to an edited recurring payable |
|
Save/New |
Alt+w |
Same as Save button plus the New button |
|
Cancel |
Alt+c |
To cancel adding or editing a recurring payable |
|
Review distrib |
Alt+b |
To view and edit the distributions for a recurring payable. See Expense Distributions |
|
Exit |
Alt+x |
To exit the screen. You may also use the <Esc> key |
Menu Selections
At the top left of the screen menu selections are available. Most of these are the same from screen to screen. The selections that are unique to this screen are explained here:
From the Options menu you may select Viewing Vendor Invoices and View vendor open items. You may also Select for use, Print the selection list and Use selected. For more about these functions see: Selecting Recurring Payables for Use, Printing a Selection List and Use Selected, and Selecting Recurring Payables.
From the Print menu you may print a recurring payables edit list. See Printing an Edit List.
From the Print menu you may print the Edit list.
Character Mode

Options
In character mode you may use one of the options on the Vendor # field:
|
<F1> |
For the next entry. Upon selection, the remainder of the screen fills in with the appropriate data |
|
<SF1> |
For the previous entry |
|
<F2> |
For the next vendor, in vendor number sequence (whether or not there is any existing recurring payable entry for this vendor) |
|
<SF2> |
For the previous vendor |
|
<F6> |
For the same vendor as the previous entry. This option is not available on the first entry of a session |
|
Blank |
To select a vendor by name rather than by number |
Enter the following information:
Enter the number of the vendor for this recurring payable. Temporary vendors are not eligible for recurring payables.
|
Format |
6 characters |
|
Example |
Type 200 |
Name
If you have selected an existing entry or an existing vendor in the previous field, the vendor name appears automatically. If you have left the vendor number blank, the cursor moves here to allow entry of the vendor by name. Upper/lower case is significant. You may enter just the leading characters of the name.
Options
Your options are:
|
<F2> |
For the next vendor, in vendor name sequence |
|
<SF2> |
For the previous vendor |
|
Blank |
To revert to entering the vendor by number |
|
Format |
25 characters |
|
Example |
(In this example the name appears automatically) |
The invoice code is used to identify this recurring payable for this vendor.
You can have many invoice codes for the same vendor. For a given vendor and invoice code, there is only one entry (that is, you cannot have both a fixed and a variable entry for the same invoice code and vendor).
When a vendor has more than one recurring payable, the invoice code provides a means of distinguishing amongst them. There is another and optional use for this code, which will be described in Use selected.
Enter the invoice code which identifies this recurring payable for the vendor. This field is required, even if the vendor only has one recurring payable.
Options
You may use one of these options:
|
<F1> |
For the next entry for this vendor. Upon selection, the remainder of the screen fills in with the appropriate data. |
|
<SF1> |
For the previous entry for this vendor |
|
Format |
6 characters |
|
Example |
Type SUPPLY |
This is the type of recurring payable Fixed or Variable. In character mode F for fixed, or V for variable.
| • | A fixed recurring payable has the same invoice amount each period. An example is rent. |
| • | A variable recurring payable has a variable invoice amount from period to period. An example is a telephone bill. |
For either type, you can still change the amount due and non-discountable amount when you select the recurring payables for use, using manual selection (refer to Selecting Recurring Payables for Use).
When you select recurring payables for use, you can choose between automatic and manual selection.
| • | In manual selection, you may enter changes to the amount due and non-discountable amount, as above. This is most suitable for variable recurring payables, since you would usually want to make such changes. |
| • | In automatic selection, the recurring payable (fixed or variable) is selected as is. This is most suitable for fixed recurring payables, which usually require no changes. |
In the next field (Group), you could set up separate groups for fixed and variable recurring payables. Then you could choose the fixed group in Select for use and use automatic selection on them. Similarly, you could choose the variable group and use manual selection for them so that you could enter the varying information.
|
Format |
Graphical mode: Drop down list, either Fixed or Variable Character mode: One letter, either F or V |
|
Example |
Select Fixed |
You may set up groups of any kind here, so that you may later select a group of recurring payables from which to create vouchers. This code is optional.
Options
Enter the group to which this recurring payable is to be assigned, or use one of the options:
|
<F1> |
For the vendor’s payment group from Vendors |
|
<F2> |
For the vendor’s vendor type from Vendors |
Any entry is accepted, and no list of valid codes is maintained. If you use this feature, you should develop your own list of valid codes before creating any recurring payables, and apply it consistently.
|
Format |
3 characters |
|
Example |
Type OFC |
Enter the purchase order number authorizing the recurring payable (if any). This field is optional. If you are interfaced to the P/O module, this would typically be a blanket purchase order.
|
Format |
15 characters |
|
Example |
Type 224012 |
Enter the amount due. This is the amount due each time the recurring payable is used, not the total amount of all uses. The amount can be zero for a variable payable, but a fixed payable must have a non-zero amount.
|
Format |
999,999,999.99- |
|
Example |
Type 156 |
Enter any part of the vendor’s invoice that is not eligible for a discount. This amount must have the same sign, and cannot be greater than, the amount due.
|
Format |
999,999,999.99- |
|
Example |
Press <Enter> to set the non-discount amount to zero. |
Reference can be useful in the following ways:
| • | It can optionally be printed on check stubs if check formats 1, 3 or 4 are used. |
| • | If you use G/L, you can choose to transfer either this reference or the vendor name to G/L. This is useful if you want G/L to show the reason why something was purchased, instead of the vendor from whom it was purchased. Consult your accountant for advice. |
| • | It appears on the A/P Distributions to G/L Report and optionally appears on the Aged Open Items Report. |
If desired, enter a reference. This field is optional.
|
Format |
25 characters |
|
Example |
Type Front desk supplies |
The first format is for vendors using day terms, and is entered as the number of days (1 through 999) when the item is due for payment, measured from the vendor’s invoice date.
The second format is for vendors using proximo terms, and is entered as a day of the month (1 through 31).
Options
Enter a valid value, or use one of the options:
|
<F1> |
To set terms fields to this vendor’s default values in Vendors. The Discount amount field is calculated from the discountable amount and the discount percent. |
|
<F2> |
(Only available if this vendor uses proximo terms) To use day terms for this entry. This is not a toggle, and you cannot press <F2> a second time to return to proximo terms. |
|
Format |
999 |
|
Example |
Press <F1> |
The first format is for vendors using day terms, and is entered as the number of days within which payment must be made to take advantage of the vendor’s early payment discount (1 through 999, but not greater than due days).
The second format is for vendors using proximo terms, and is entered as a day of the month (1 through 31, but not later in the month than due day).
Options
Enter a valid value, or use the option:
|
Blank |
For no discount. The Discount days, Discount % and Discount amount fields will be set to zero, and Discount account field cannot be entered. |
|
Format |
999 |
|
Example |
(The cursor does not move to this field because you pressed <F1> at the Disc days or Disc day field.) |
Discount amount
These fields are set automatically if you pressed <F1> at the Due days or Due day field, or if you left the Disc days or Disc day field blank.
Otherwise, enter the discount as either as a percentage in the first field of this pair, or as an amount in the second.
| • | If this is a new entry, the cursor moves first to the Discount % field to allow entry of a percent (there is no default). |
If you press <Enter>, the cursor moves to the Discount amount field to allow entry of an amount. If you leave the amount as well as the percent blank, there is no discount and the Discount account field cannot be entered. If you enter a non-zero amount, the corresponding percent is calculated and displayed in the Discount % field, and the cursor moves to the Discount account field.
If you enter a non-zero percent in the Discount % field, the software automatically calculates the amount and puts it into the Discount amount field. The cursor then proceeds to the Discount account field.
| • | If this is an existing entry, you can change either the percent or the amount. The Discount %, Discount amount, the total amount, and the Non-discountable amount are related fields, and change to any one of them causes automatic re-calculation of the others. |
The Discount % is always positive. The Discount amount is negative if (and only if) the invoice amount is negative.
|
Format |
99.99 (for the percent) 99,999,999.99-(for the amount) |
|
Example |
(The cursor does not move to this field because you pressed <F1> at the Disc days or Disc day field.) |
If the Discount % and Discount amount fields are blank, this field may not be entered.
Options
Otherwise, enter the number of the account for this discount. This must be a valid account from Valid G/L accounts. You may use the option:
|
<F2> |
For the vendor’s default discount account |
Upon entry or selection of a valid account, its description appears below its account number.
|
Format |
Your standard account number format, as defined in Company Information |
|
Example |
(The cursor does not move to this field because you pressed <F1> at the Disc days or Disc day field.) |
** Gets 1099 **
If you have unchecked the field Print 1099 forms in Control Information, this field will not display and the 1099 type field cannot be entered.
Otherwise, this field displays near the top of the tab to indicate that this vendor is set up to get a 1099 form, as determined by your entry in Vendors. When it displays you may enter the 1099 type field.
This field defaults to the setting in the 1099 type field in Vendors.
Otherwise, specify here the default type of MISC 1099 for this vendor. These are the options:
| Character | Graphical | Description |
|
N |
None |
Vendor does not require 1099 processing |
|
1 |
Rents |
Rents |
|
2 |
Royalties |
Royalties |
|
3 |
Other income |
Other income |
|
5 |
Fishing proceeds |
Fishing boat proceeds |
|
6 |
Med/Health Card payments |
Medical and health care payments |
|
7 |
Non-employee Comp |
Non employee compensation |
|
8 |
Print in lieu of Div/Int |
Substitute payments in lieu of dividends or interest |
|
Format |
Graphical: Drop down list with the options listed above Character: One option from the list above |
|
Example |
This field does not apply for this example |
The following two fields are informational only (read only). Input is not allowed in these fields.
The last voucher for this vendor displays.
The date of the last voucher for this vendor displays.
** Selected ** or Not selected
This appears only for an existing entry, and indicates whether or not this entry is currently selected for use.
If this is an existing entry and is currently selected, change or deletion is not allowed. Press <Enter> to clear the screen and allow processing another recurring payable.
Options
If this is a new entry or an unselected existing entry, make any desired changes. For an existing entry, you may not change the Vendor, Invoice code or Entry type fields, but you may use the option:
|
Delete button or <F3> key |
To delete this entry |
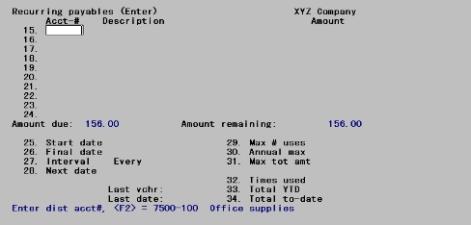
Character Mode
The accounts information and recurring interval information are on a second screen. Fields 15 through 24 contain the accounts while 25 through 28 the interval. Fields 29 through 34 contain the totals for the recurring payable.
When there are no further changes, press <Enter> for the second screen:
|
Note |
The recurring interval fields (Fields #25 through 28 in character mode) are used by the system to determine which recurring payables to choose during the automatic selection process. They do not prevent you from selecting this recurring payable manually. Provided that other selection criteria (such as group code) are met, automatic selection will select this entry whenever the specified “next date” falls due, unless that is earlier than the specified start date or later than the specified final date. It will also calculate a new next date to be ready for the next cycle. If you do not use automatic selection at all, or if you do your automatic selection by group rather than by date, it makes no difference what you enter in these fields (but you must still enter something). |
Options
Enter the date on which to start using this recurring payable, or use the option:
|
<F2> |
For None (no starting date) |
|
Format |
MMDDYY |
|
Example |
Press <F2> |
Options
Enter the final date on which this recurring payable is to be used, or use the option:
|
<F2> |
For Indefinite (no final date) |
|
Format |
MMDDYY |
|
Example |
Press <F2> |
After this date, this entry will not automatically be selected for use when you select by date; however, it still remains until you explicitly delete it.
This specifies the time interval between uses of this recurring payable. Enter a number and then a time period.
You must specify an interval even if you intend to use this recurring payable at unpredictable intervals. In this case you may wish to give this entry a group code of its own even if your automatic selection is normally done by date. Otherwise you must unselect this entry manually when it is not wanted (if you have chosen a short interval), or select it manually when it is wanted (if you have chosen a long interval).
|
Format |
(for the interval ) 99
(for the time period) A single letter, either D for Days, W for Weeks, or M for Months |
|
Example |
Type 1, press <Enter>, type M, press <Enter> again. This means that the payable recurs once each month. |
Enter the next date the recurring payable should be activated.
This date is used as a default when you later run Select for use in the Distribution date and Invoice date fields.
The next date is automatically advanced by the time interval entered in Interval: Every field each time a voucher is created from this recurring payable (by running Use selected). Paying one cycle a few days late or early does not upset the schedule for the next cycle.
When calculating the next date by day or by week, the interval specified is projected forwards without regard to day of month. When calculating the next date by month, this month’s calendar date is projected forwards into the next month, except that the last day of the month remains the last day even when the next month is longer or shorter than this month.
If you are paying on schedule, the calculated next date will normally be a future date. However, the system will accept this date even if it is not (that is, it will not add the interval twice so as to force the next date into the future). This means that if you skip one payment and compensate by paying double on the next, the recurring payable will by out of sync by one cycle until you adjust it manually.
|
Format |
MMDDYY The default is the start date, if one was entered; otherwise the current system date. You cannot enter a date earlier than the Start date if one is present, or earlier than the Final date if one is present. |
|
Example |
Press <Enter> for the default. |
|
Note |
The interval fields, fields #29 through 34 in character mode. can be used to restrict the number of times this recurring payable is used or the amount paid on this recurring payable. This feature can be used independently of the date restrictions described above, and works for both manual selection and automatic selection. This is useful if you do your automatic selection exclusively by group code (instead of by date). You can also use this feature for loan payments, where the number of payments is fixed in advance. The entry remains once the limit has been reached. You are not prevented from selecting for use a recurring payable which has reached its limit, but you are warned each time you attempt to do so. |
Options
Enter the maximum number of times this recurring payable can occur, or use the option:
|
<F2> |
For Indefinite (no limit) |
|
Format |
99,999 |
|
Example |
Press <F2> |
Options
Enter the maximum annual amount for this recurring payable, or use the option:
|
<F2> |
For indefinite (no maximum annual amount) |
|
Format |
9,999,999,999.99- |
|
Example |
Press <F2> |
You can have an annual maximum even though you have no total maximum, and vice versa.
The maximum total amount is the maximum amount to be invoiced over the entire life of the payable. For example, a recurring payable used for repayment of a loan would have a maximum amount.
This field is compared to the totals of all vouchers generated to date from this recurring payable to see if the maximum amount specified here has been reached yet. It issues a warning if the invoice currently being generated will exceed the maximum amount.
Options
Enter the amount, or use the option:
|
<F2> |
For indefinite (no maximum total amount) |
|
Format |
99,999,999,999.99- |
|
Example |
Press <F2> |
|
Note |
The historical and totals fields, fields #32 through 34 in character mode, contain historical information which is automatically maintained by the system. You can enter these fields when creating a new recurring payable, but even in this case you would normally do so only when initially setting up Accounts Payable. For existing entries, these fields are protected against change. See the Company information chapter in the PBS Administration documentation for information on how to allow override change protection. |
When first setting up a recurring payable, enter the number of times this payable has been used. If you were making payments before you began using A/P, enter the number of prior payments. In this case, you would set the maximum number of uses above to include these payments.
For instance, if you were paying off a loan in 30 installments and had already made 5 payments, you would enter 30 in field 29 and 5 here.
This field is automatically updated each time you create a voucher from this recurring payable.
|
Format |
99999 |
|
Example |
Press <Enter> |
When first setting up a recurring payable, enter the YTD total amount already paid.
For instance, if you were paying off a $10,000 loan and you had already paid $2,000 this year, you would enter $2,000 here.
This field is automatically updated each time you create a voucher from this recurring payable.
At the year end closing (run in Close a year), this field automatically clears to zero. See Close a Year in the Year-End chapter.
|
Format |
9,999,999,999.99- |
|
Example |
Press <Enter> |
When first setting up a recurring payable, enter the total already paid to-date.
For instance, if you were paying off a loan with total payments of $10,000 and you had already paid $3,500, you would enter $10,000 in field 31 and $3,500 here.
|
Format |
99,999,999,999.99- |
|
Example |
Press <Enter> |
|
Note |
The following fields are informational and cannot be changed. They appear only if this is an existing entry. |
** Selected ** or Not selected
This indicates whether or not the entry is currently selected for use.
Expired
This appears only if one or more of the following conditions are true:
| • | Next date (Field #28 in character mode) is later than Final date (#26). |
| • | Times used (Field #32) is greater than Max # uses (#29). |
| • | Total to-date (Field #34) is greater than Max tot amt (#31). |
| • | Total YTD (Field #33) is greater than Annual max (#30). |
Last voucher
Last date
These are voucher number and date of this entry’s most recent use. They are only updated when a recurring payable is used.
Recurring payables, unlike regular payables, are restricted in the number of distributions allowed for any one entry: you can have no more than ten. They are also restricted in that you can distribute expenses only to G/L accounts, not to jobs. However, once the recurring payable has been transferred (via Use selected), you can re-distribute the expenses to any number of accounts or jobs using Payables (Enter).
If the entry type is Fixed, enter these distributions as dollar amounts.
If the entry type is Variable, enter them as percentages; each time the recurring payable is selected for use, the total amount entered will be distributed in proportion to these percentages.
Character Mode
The ten distributions are organized into a table, with separate rows for each distribution and separate columns for account number, description, and amount. The distributions are not required to be in any particular sequence.
If the entry type is Fixed, the total amount due and the amount remaining to distribute display continuously at the foot of the table. If the entry type is Variable, the percent remaining to distribute displays instead. The amount or percent remaining can (temporarily) become negative.
In each row the cursor moves through these columns in succession.
For a new entry, Fields #15 through 24 are entered in succession:
| • | As soon as the amount remaining to distribute reaches zero, the cursor moves to Field #25. If you wish to continue entering distributions, do so from Field number to change?. |
| • | If all ten distributions have been entered, the cursor will not move to Field #25 unless the amount or percent remaining is zero. |
For an existing entry, you can change Fields #15 through 24 from Field number to change?. To add a new distribution, enter the number of any of the fields that are currently blank.
When you exit the screen, any blank rows in the table will be closed up, so the same distribution may not have the same field number the next time that you look at this entry. The order of the distributions is not changed, however.
Graphical Mode
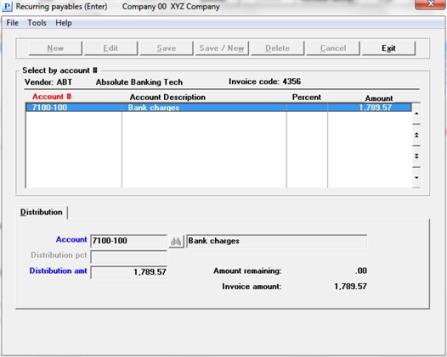
Expense Distributions List Box
The list box displays up to 6 recurring payable distributions at a time. You may sort the recurring payable distributions account number in ascending or descending order. Only column names in red may be sorted. Click on the column name or the arrow to the right of the column name to change the sort or use the View options.
To locate a recurring payable distribution, start typing the account number. You may also use the up/down arrows, Page up, Page down, Home and End keys to locate a distribution. The <F1> and <SF1> function the same as the up/down arrow keys.
Recurring payable distributions that display in the list box are available for changes or deletion. The fields for the selected recurring payable distribution display in the lower part of the screen.
When a recurring payable distribution is found, you may select the <Enter> key or Edit button to start editing.
The buttons and keyboard equivalents have the following functions:
| Button | Keyboard | Description |
|
New |
Alt+n |
To enter a new recurring payable distribution |
|
Delete |
Alt+d |
To delete the recurring payable distribution selected in the list box. Selecting <F3> will also delete it |
|
Edit |
Alt+e |
To edit the recurring payable distribution selected in the list box |
|
Save |
Alt+s |
To save a new recurring payable distribution or changes to an edited recurring payable distribution |
|
Save/New |
Alt+w |
Same as Save button plus the New button |
|
Cancel |
Alt+c |
To cancel adding or editing a recurring payable distribution |
|
Exit |
Alt+x |
To exit the screen. You may also use the <Esc> key |
Options
Enter the account number to which all or a portion of the expense will be distributed. In the first segment of the account number, you may use one of the options:
|
<F2> |
(For the first distribution of a new entry) For this vendor’s default distribution account from Vendors |
|
<F2> |
(For any existing distribution of an existing entry) To leave the account number of this distribution unchanged |
|
<F3> |
To delete this distribution. This option is only available when the amount or percent remaining to distribute is negative, so if you are making extensive changes add the new entries before deleting the old ones. |
|
<Esc> |
To cancel the entire entry (not just this screen but the first screen as well) |
The account number must already exist in Valid G/L accounts and may not duplicate the account number of any other distribution in this entry.
|
Format |
Your standard account format, as defined in Company information |
|
Example |
Press <F2> |
Description
The account description displays automatically and can not be changed.
Distribution pct
Options
Depending on whether you selected fixed or variable for the Entry type field, enter either an amount or a percent. You may use the option:
|
<F2> |
For the amount or percent remaining to distribute |
|
Format |
999,999,999.99- (for an amount) 999.99- (for a percent) Zero is not allowed in either case. |
|
Example |
Press <F2> |
Make any desired changes. Press <Enter> to exit the screen. You can only do so if the amount or percent remaining to distribute is zero. If it is, you will be returned to the first screen for the next entry.
The Recurring Payables Edit List shows all recurring payables. Do not confuse this with the Recurring Payable Selection List, page, which lists only entries selected for use.
Select
Edit list from the Recurring payables menu or Recurring payables edit list from the Reports menu.
Graphical Mode
The screen similar to this appears:

Character Mode
The following screen appears:
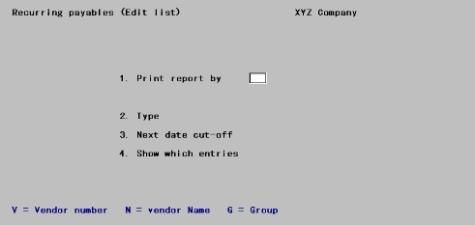
Enter the following information:
Select whether to print the report in order by Vendor number, Vendor name or Group.
|
Format |
Graphical mode: Drop down list Character mode: One letter, either V, N, or G |
|
Example |
Type V for Vendor number |
Starting vendor #
Ending vendor #
These fields appear only if you entered Vendor # in the Print report by field.
Options
Enter the range of vendor numbers to be included in the report. At each field you may use the option:
|
<F2> |
For the First starting vendor number or Last ending vendor |
|
Format |
6 characters |
|
Example |
Press <F2> at each field. |
Starting vendor name
Ending vendor name
These fields appear only if you entered Vendor name at the Print report by field.
Options
Enter the range of vendor names to be included in the report. At each field you may use one of the options:
|
<F2> |
For the First starting vendor name or Last ending vendor |
|
<F3> |
To toggle between entering a personal name and a corporate name. The initial assumption is a corporate name. |
|
Format |
For a corporate name: 25 characters For the name of an individual: 14 characters (surname) 10 characters (personal name) |
|
Example |
(Does not occur in this example because you chose Vendor number at the Print report by field) |
If you enter the name of an individual for one field you must do so for the other.
These fields appear only if you entered Group at the Print report by field.
Options
Enter the range of group codes to be included in the report. At each field you may use the option:
|
<F2> |
For the First starting group or Last ending group |
|
Format |
3 characters |
|
Example |
(Does not occur in this example because you chose Vendor number at the Print report by field) |
Blank is a valid entry, and selects only those recurring payables which do not have a group code.
Options
Select Fixed to print fixed recurring payables only, Variable for variable recurring payables only, or "All" for All recurring payables.
In Character mode, use the option:
|
<F5> |
For All recurring payables |
|
Format |
Drop down list |
|
Example |
Press <F5> |
This selection allows you to show only those recurring payables from which a voucher is to be produced by a certain date. Only recurring payables with a next date on or before the date entered are included.
Options
You may enter a date manually or use the date lookup to enter a chosen date. Or you may use the following option:
|
<F2> |
For the Latest date. This means that entries will be printed regardless of what their next date is. |
|
<F4> |
To locate a date using the calendar date lookup. In windows character mode you may use <F7> to access the date lookup |
|
Format |
MMDDYY The default is the system date. |
|
Example |
Press <F2> |
Select which entries are to appear on the edit list:
| Character Mode | Graphical Mode | Description |
|
A |
All |
All entries |
|
E |
Expired |
Only expired entries. This feature can be used to identify Recurring payable entries which are good candidates for deletion. |
|
O |
Over annual max |
Only entries for which the amount paid this year is over the annual maximum |
|
Format |
One letter from the list above |
|
Example |
Type A |
Select OK to print the recurring payables edit list. Select Cancel to not print.
See a Recurring Payables Edit List example in the Sample Reports appendix.
The Select for use menu selection enables you to select which recurring payables will become vouchers.
To create a voucher from a recurring payable, you must select it here first and then run the Use selected function below to transfer it to A/P Transactions. In A/P Transactions, it becomes just like any other voucher.
You may choose either automatic or manual selection.
You may also use this function to unselect a recurring payable that was previously selected for use.
You may use this selection to select a recurring payables to be used by turning it into a payable.
Select
Select for use from the Recurring payables menu.
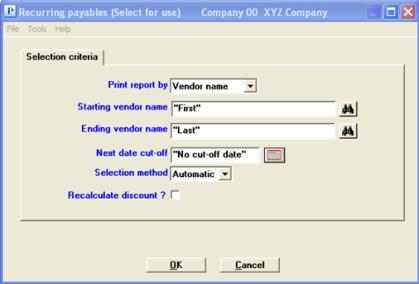
Graphical Mode
A screen similar to the following appears:
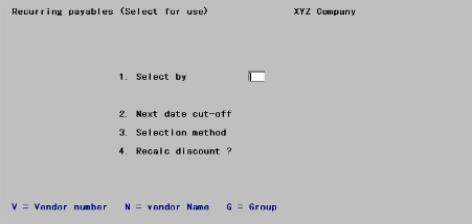
Character Mode
The following screen appears:
Select either Vendor name, Vendor number, or Group.
In Character mode, choose whether to select recurring payables for use by V (vendor number), N (vendor name), or G (recurring payable group).
|
Format |
Character mode: One letter, either V, N, or G Graphical mode: Drop down list |
|
Example |
Type V, Select Vendor number |
Starting vendor #
Ending vendor #
These fields appear only if you are selecting recurring payables by vendor number. "First" and "Last" are the defaults.
Options
Enter the range of vendor numbers to be included in the report. It is not required that either number be entered, but there should be at least one vendor within the range specified. At each field you may use the option:
|
<F2> |
For the First starting vendor number or Last ending vendor |
|
Format |
6 characters |
|
Example |
Press <F2> at each field. |
Starting vendor name
Ending vendor name
These fields appear only if you selected Vendor name in the Select by list box field.
Enter the range of vendor names to be included in the report. It is not required that either name has been entered, but there should be at least one vendor within the range specified. At each field you may use one of the options:
|
<F2> |
For the First starting vendor name or Last ending vendor |
|
<F3> |
To toggle between entering a personal name and a corporate name. The initial assumption is a corporate name |
|
Format |
For a corporate name: 25 characters
For the name of an individual: 14 characters (surname) 10 characters (personal name) |
|
Example |
(Does not occur in this example because you chose V at Field #1) |
If you enter the name of an individual for one field you must do so for the other.
These fields appear only if you selected Group in the Select by list box field.
In Character mode these fields appear only if you entered G at the Select by field.
Options
Enter the range of group codes to be included in the report. At each field you may use the option:
|
<F2> |
For the First starting group or Last ending group |
|
Format |
3 characters |
|
Example |
(Does not occur in this example because you chose Vendor number on the first field) |
Blank is a valid entry, and selects only those recurring payables which do not have a group code.
Options
If you want to select only those recurring payables with a next due date on or before a specific date, enter that date here. You may use the date look-up or enter manually. "No cut-off date" is the default. You may also use the option:
|
<F2> |
For the Latest date. This means that entries will be selected regardless of what their next date is |
|
Format |
MMDDYY |
|
Example |
Press <F2> |
Choose A = Automatic or M = Manual selection of recurring payables.
If you choose Automatic selection, recurring payables are selected based on the criteria entered above. The option to Recalculate discount becomes available with this selection. See Automatic Selection.
If you choose manual selection and complete the entries on this screen, the recurring payables meeting the criteria above will be displayed one by one. You may then manually select which ones to make into vouchers. Recalculate discount on this screen is skipped for manual selection mode. See Manual Selection.
|
Format |
Graphical mode: Drop down list. Select either Automatic or Manual Character Mode: One letter, either A or M |
|
Example |
Type M in character mode or select Manual in graphical mode |
Check the box to have discounts recalculated when each selected recurring payable becomes a voucher. Otherwise, the discount calculation in effect when the recurring payable was first entered is used.
Checking the box ensures that any changes in discount calculation are considered.
Checking the box will also permanently change the discount percent and discount amount in the recurring payables record.
In Character mode:
|
Format |
Character mode: One letter, either Y or N Graphical mode: Check box where checked is yes and unchecked is no |
|
Example |
Cannot be entered because you entered Manual at the selection method field |
Select OK to select the recurring payables for use or Cancel to return to the menu without selecting.
The recurring payables that you have specified are selected automatically by the computer. This may take a few minutes.
The Recurring Payables Automatic Selection Edit List is printed. A sample Recurring Payables Automatic Selection Edit List appears in the Sample Reports appendix.
Automatic selection does not unselect any entries that are already selected. Thus you can repeat the automatic selection to select a different range or group, or you can use manual selection to fine-tune your choices.
Two screens are required for manual selection.
Graphical Mode
The first screen, similar to the following appears:
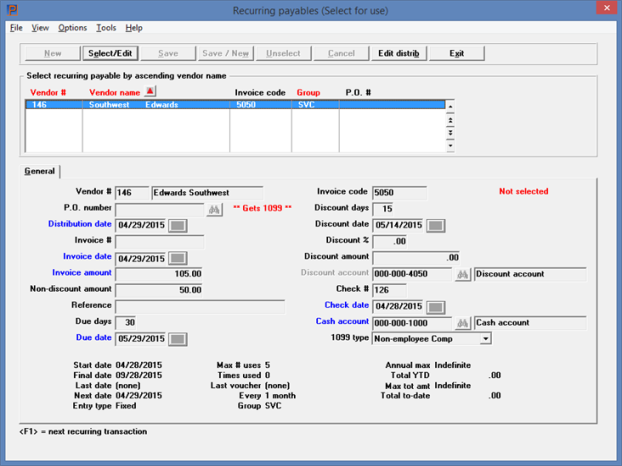
From this screen you can work with existing Recurring payables entries only. The expectation is that you only want to work with the entries that match your selection criteria as entered on the first screen, so the option keys will only show you those. However, if you explicitly enter the vendor number and invoice code of an existing entry which does not match this expectation, you can still work with it.
Use this button to select the recurring payables.
This button displays the distributions window where you may edit the distributions.
IF the recurring payable has already been selected you will be asked if you want to unselect it.
See The distribution screen for selection a recurring payable.
To change data on an entry see Processing a Selected Entry.
To unselect an entry see Unselecting Recurring Payables.
Character Mode
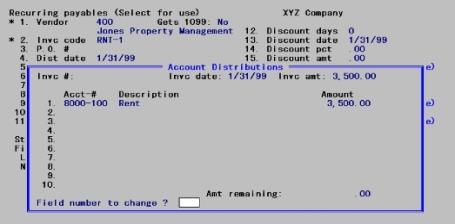
The first screen appears:

From this screen you can work with existing Recurring payables entries only. The expectation is that you only want to work with the entries that match your selection criteria as entered on the first screen, so the option keys will only show you those. However, if you explicitly enter the vendor number and invoice code of an existing entry which does not match this expectation, you can still work with it.
Enter the following information:
1. Vendor #
This field is only accessible in character mode.
Options
To find the recurring payable you want, enter the vendor number, or use one of the options:
|
<F1> |
For the next recurring payable matching the parameters entered on the previous screen |
|
<SF1> |
For the previous entry |
|
Format |
6 characters |
|
Example |
Type 200 |
2. Invoice code
If you have used the option keys in Field #1, this field (and all the other fields on the screen) contain the information for this entry, and the cursor is positioned at Field number to change?.
Options
Otherwise, enter the invoice code of the desired recurring payable; or use the option:
|
<F1> |
For the next recurring payable for this vendor |
|
<SF1> |
For the previous recurring payable for this vendor |
|
Format |
6 characters |
|
Example |
Press <F1> |
Graphical Mode
If a recurring payable has been selected, the Unselect button is available when the focus is on the payable in the list box. This button only becomes active if this entry has already been selected and has not yet been processed by Use selected.
If you wish to unselect the recurring payable, you may click on Unselect, You may also select <Alt+u> or the <F3> key to do the same.
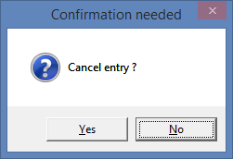
When unselecting the recurring payable the following message displays:
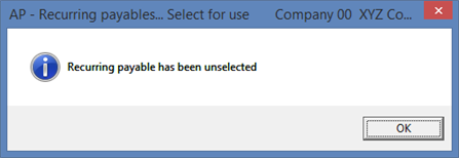
Select OK to proceed.
Character Mode
Once an entry has been chosen, either by use of the function keys or by direct entry into Fields #1 and 2, one or the other of the two messages following will appear depending on whether or not the entry has already been selected.
This entry has already been selected. Do you want to unselect it?
This only appears if this entry has already been selected and has not yet been processed by Use selected.
| • | Answer Y to unselect it. Since Select for use only operates on selected entries, and this entry is no longer selected, you cannot change it further. The screen clears and the cursor is positioned at Field #1 for selection of a different entry. |
| • | Answer N to continue. This lets you change the information for an entry that has already been selected. The cursor is positioned at Field number to change? |
This only appears if this entry is not yet selected.
| • | Answer N to skip this entry. The screen clears and the cursor is positioned at Field #1 for selection of a different entry. |
| • | Answer Y to flag this as a selected entry and to continue processing it. If the entry has expired, you will be informed of the fact, told why it has expired, and asked whether you wish to select it anyway. |
Some fields are available for editing. Since the fields on this screen are the same ones that have already been described in the Entering Recurring Payables section, only those that are of special interest are described here.
Character Mode
Once an entry has been selected fields do the following:
Some fields on the screen require change and are changed automatically. The screen will appear to blink as date fields are updated. Specifically:
The next date stored in the recurring payable is displayed for the invoice date.
The due date and discount date calculated from the terms entered for this recurring payable are calculated and displayed.
Some fields on the screen require change and are changed manually. The cursor moves to those fields to allow you to enter them. Specifically:
For a Variable recurring payable the cursor moves in succession through Fields #5 through 8 before coming to rest at Field number to change?.
For a Fixed recurring payable the cursor moves directly to Field number to change?.
| • | Some fields on the screen allow change. |
Graphical and Character Mode
Enter or change the following fields:
For a Variable entry, the cursor moves to this field automatically; for a Fixed entry, you can change it from Field number to change?. If you do not have the vendor’s invoice number or do not wish to enter it, you can leave this blank. Use selected will create one automatically from the invoice code and the invoice date.
|
Format |
15 characters |
|
Example |
Press <Enter> |
For a Variable entry, the cursor moves to this field automatically.
Enter the invoice date that will be used for the voucher.
|
Format |
MMDDYY The default is the recurring payable’s Next date field. |
|
Example |
(Not used in this example) |
For a Variable entry, the cursor moves to this field automatically. Enter the invoice amount:
|
Format |
99,999,999,999.99- |
|
Example |
(Not used in this example) |
For a Variable entry, the cursor moves to this field automatically. Enter the non-discountable amount (the amount that is not discounted).
|
Format |
99,999,999,999.99- |
|
Example |
(Not used in this example) |
Enter the check number only if this invoice has already been paid with a manual check.
|
Format |
999999 |
|
Example |
(Not used in this example) |
If you entered a check number, the cursor moves to this field automatically.
|
Format |
MMDDYY |
|
Example |
(Not used in this example) |
Options
Enter the cash account where this manual check is to be posted, or use one of the options:
|
<F1> |
For the next entry in Cash accounts. If there is only one entry, the <F1> and <SF1> options do not appear. |
|
<SF1> |
For the previous entry in Cash accounts |
|
<F2> |
For the default cash account from Control information |
|
Format |
Your standard account number format, as defined in Company information |
|
Example |
(Not used in this example) |
Make any needed changes. If you change the invoice amount, you should also change the non-discountable amount (if any) and the discount amount (if any). If you change the discount amount, you are asked to change the discount account or confirm that it is the same.
Press <Enter> when finished making changes to obtain the distribution screen.
Use original distribution percentages?
This question only occurs if this is a Variable entry and you have changed the invoice amount since the entry was originally selected for use. Answer N to recalculate the distributions to match the new invoice amount, pro-rating them according to the original percentages. Answer Y to leave the distribution amounts unchanged (meaning that the distribution screen will be out of balance and you will have to adjust it manually).
When you are finished editing a recurring payable click on the Save button to select it. You may select use <Alt+s>.
The distributions screen displays next.
The distribution screen is always displayed, even if this is an existing selected entry and you have not changed the invoice amount.
Graphical Mode
The following screen displays:
This screen is entered in the same way as for Recurring payables (Enter). See Expense Distributions for instructions.
If the distributions are okay as is select the Exit button to proceed. The following message displays:
Select Yes to cancel the entry of distributions. Select No to continue.
Character Mode
The following screen appears:
This screen is entered in the same way as for Recurring payables (Enter). Those instructions are not repeated here. The only differences are:
| • | Only the ten distributions appear on the screen. Fields #1 to 10 correspond to Fields #15 to 24 in Recurring payables (Enter). |
| • | For Variable entries, a column for amount appears to the right of the column for percentages. These amounts are informational only; distributions must be entered as percents. |
Make any desired changes. Press <Enter> to select another entry for use. You will only be able to do this if the amount or percent remaining to distribute is zero.
The selection list shows every recurring payable that has been selected. It shows exactly what vouchers will be created when Use selected is run next.
Use the selection list to verify and determine if an selections require editing. Running the edit list is optional. If you already know the selected recurring payables are correct, you can skip to Using Selected Recurring Payables.
Select
Selection list from the Recurring payables menu or Recurring selection list from the Reports menu.
No selection screen to filter the recurring payables appears, as all selected recurring payables are printed unconditionally. You will be asked to select a printer.
See a Recurring Payables Selection List example in the Sample Reports appendix.
When you have verified that your selection of recurring payables is correct, you may create vouchers for those recurring payables which were selected. The recurring payables will become unposted vouchers in A/P Transactions (along with the other vouchers created in Payables). The used recurring payables remain, but are no longer flagged as selected; they are available for the next time you choose to select them.
There are six types of entries in Payables but only two of these types can be created from recurring payables:
| • | Selected recurring payables that have no check number become Regular vouchers |
| • | Selected recurring payables that do have a check number become Non-A/P check vouchers |
If the entries being used were selected automatically, you have not entered the vendor’s invoice number on each one. This may be the case even if the entries were selected manually, since invoice number is an optional field. In order to uniquely identify each voucher, the Use selected function automatically supplies a value for blank invoice numbers. This it does by joining together the invoice code and the date. Although this feature saves you work, it makes it harder for the vendor to match up your check with his invoice, since the invoice number cannot be printed on the check stub.
Select
Use selected from the Recurring payables menu.
Only a printer selection screen appears because all selected entries are used. If this is not what you want, change and add more selections via Select for use before using them.
You will be asked to choose a printer for the Recurring Payables Register. After choosing a printer you are told, “Regular payables will now be created for selected recurring payables,” and asked whether you wish to proceed.
|
Format |
Graphical mode: Window with Yes/No buttons. The default is No Character mode: One letter, either Y or N. The default is N. |
|
Example |
Select Yes |
There may be a period of processing as vouchers are created and the register is printed.
Once the vouchers are created, they are indistinguishable from vouchers entered manually. You still have to post them through Payables. Until you do you can change or delete them at will. See the Payableschapter.